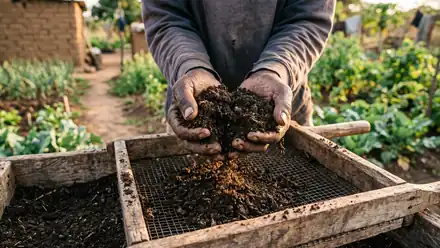
Vermicomposting in Zimbabwe: turn waste into worm compost
A practical guide to vermicompost Zimbabwe farmers can make at home — the right worms, how to build a bin, what to feed them, and when to reach for ready-made compost instead.

Zimbabwe’s soils are tired. Decades of cropping on sandy, low-organic-matter ground have stripped out the humus and biology that hold nutrients and moisture. The quickest, cheapest intervention available to most small farmers is also right under their feet: organic waste. Vermicomposting turns that waste — kitchen scraps, market leftovers, manure — into one of the richest soil amendments you can make at home, using nothing but worms, water, and shade.
This guide covers everything you need to start worm farming in Zimbabwe’s climate.
Want our free soil guides sent to you? Join the mailing list and we’ll add you to the next mailout.
At a glance: vermicompost vs hot compost
| Feature | Vermicompost (worm compost) | Hot heap compost |
|---|---|---|
| Heat generated | None — “cold” process | 60–70 °C at peak (FAO) |
| Weed-seed kill | No — do not use weeds with seeds | Yes, if heap reaches 60 °C |
| Nitrogen in final product | Up to 4% more than hot compost (OSU) | Variable |
| Time to finished product | 3–6 months | 2–4 months with regular turning |
| Scale | Kitchen/homestead scale | Field scale |
| Main input | Food scraps, manure, bedding | Crop residues, manure, stover |
| Suitable for Zimbabwe climate | Yes, with shade and moisture management | Yes |
Both methods improve soil organic matter, water retention, and nutrient supply (FAO Bulletin 56). They complement each other — see making compost from farm waste for the hot-heap method.
What is vermicompost and why is it rich?
Vermicompost — also called worm castings, worm compost, or vermicasting — is the end product of organic matter being processed through the digestive tract of earthworms. The worm most used worldwide is the red wiggler (Eisenia fetida), also known as the red worm or tiger worm.
What makes worm castings exceptional is biology. The red wiggler’s intestinal tract contains approximately 1,000 times more microbial life than the food it eats — it is not the food scraps themselves the worm is consuming, but the protozoa, fungi, and other microbes living on them (OSU EM-9034). Everything that passes through the worm is coated in a concentrated community of beneficial microorganisms and soluble plant nutrients — nitrogen, phosphorus, potassium, calcium, and magnesium — in forms plant roots can access quickly.
The result is a product that feeds both the soil food web and the crop at the same time.
The right worm for the job
Do not try to use garden earthworms. Eisenia fetida is a surface-dwelling species (epigeic) adapted to living in the top layer of decomposing organic matter — exactly what a worm bin mimics. Garden earthworms burrow deep into mineral soil and will not survive or thrive in a confined bin.
Eisenia fetida tolerates a temperature range of 40–90 °F (4–32 °C) but does best at 55–77 °F (13–25 °C), with peak activity and reproduction between 71–89 °F (22–32 °C) (OSU EM-9034). In Zimbabwe’s lowveld and mid-altitude growing areas, this means shade is non-negotiable in summer; in cooler highveld winters, keep your bin indoors or in a sheltered spot.
Red wigglers can eat up to their own body weight in organic material every day and can double their population in about 60 days (OSU EM-9034). Start with 500 g of worms and, after two to three months of feeding, you will have a self-sustaining colony.
Building a worm bin or bed in Zimbabwe’s climate
Size and material
The standard rule is: 1 cubic foot of bin space per 500 g of kitchen waste generated per week. A simple start for a homestead or nutrition garden is a wooden box roughly 60 cm × 45 cm × 30 cm deep — or a second-hand plastic crate with drainage holes drilled in the base.
Depth matters. Red wigglers are surface dwellers; bin depth should stay at or under 30 cm (about 1 foot) to maintain aerobic conditions throughout the bedding (OSU EM-9034). A deeper bin traps moisture and goes anaerobic — which kills worms and produces foul smells.
Wooden bins are excellent for Zimbabwe because they breathe naturally, moderating both moisture and temperature. Shade-cloth or hessian sacking makes a good lid — it keeps light out (worms are photophobic) while allowing airflow.
Location: shade and heat protection
In Zimbabwe’s hot season (October to February), your bin must be in deep shade, ideally under a tree canopy or a north-facing verandah. A bin in full sun in Harare’s summer will exceed 35 °C and kill the colony. A temperature above 32 °C is the threshold at which feeding and reproduction slow severely (OSU EM-9034).
In the highveld dry season (June to August), nights can drop to 5–10 °C. If temperatures fall below 10 °C consistently, move the bin into a kitchen or storeroom, or insulate it with old sacking.
Bedding
Fill the bin with bedding before you add worms. Good bedding for Zimbabwe:
- Shredded newspaper or cardboard (no glossy pages)
- Dry grass clippings
- Dried leaves
- Small amounts of aged cattle or goat manure
Moisten the bedding until it feels like a wrung-out sponge — when you squeeze a handful, only a few drops come out. Worms need 75–85% moisture in their bedding to breathe through their skin (OSU EM-9034). Too dry, they die. Too wet, they drown or the bin goes anaerobic.
What to feed your worms — and what to avoid
Feed these
- Fruit and vegetable scraps (chopped to 1–2 cm for faster breakdown)
- Coffee grounds and tea bags
- Eggshells (crushed — they add calcium and grit)
- Aged animal manure (cattle, goat, rabbit, poultry — in small amounts)
- Stale bread or grains in small quantities
Avoid these
- Fresh manure in large quantities — too hot, too high in ammonia
- Citrus peel, onion and garlic — in excess they acidify the bin and repel worms
- Meat, fish, dairy — they putrefy, create odour, and attract flies and rats
- Oily or heavily salted food
- Chemically treated plants or lawns (pesticide or herbicide residue)
- Weeds with viable seeds — vermicomposting is a cold process and will not kill seeds (OSU EM-9034)
Start by adding ¼ to ½ of the worm weight in food per week, then increase as the colony grows. Add fresh food in thin layers (no more than 3 cm deep) and bury it under bedding to discourage flies.
Harvesting worm castings
The migration method (easiest for Zimbabwe conditions)
Stop feeding one side of the bin for two weeks, then place fresh food only on the opposite side. Worms migrate toward the food. After two to three weeks, scoop the worm-free castings from the depleted side and add fresh bedding there.
Time
A small homestead bin will produce harvestable castings in three to six months from start-up. The castings are ready when they are dark brown to black, crumbly, and smell of rich earth — not ammonia, not rot.
Using vermicompost on your crops
| Crop use | Rate | Method |
|---|---|---|
| Seedling mix | 20–30% of total mix by volume | Mix into potting medium before filling trays |
| Transplant hole | 1–2 handfuls per hole | Place in hole, mix with soil, then transplant |
| Topdressing established crops | Thin layer around base of plant | Scratch in lightly and water |
| Soil incorporation | 1–2 t/ha equivalent | Work in before planting |
These are general ranges — application rates depend on your soil’s baseline organic matter and crop nutrient needs. Read your soil before you spend to understand what you are working with before applying anything. For crop-specific rates, message us.
Vermicompost is particularly effective on seedlings. The concentrated biology and readily available nutrients give young plants a strong early root system, which is the foundation of yield. See raising strong vegetable seedlings for how to integrate it into your seedling programme.
Realistic scale and expectations
A homestead worm bin produces modest volumes. To treat a full half-hectare vegetable garden, you would need to run a substantial operation over several seasons and accumulate large quantities of castings. Most growers use vermicompost as a precision tool — in seedling trays, transplant holes, and high-value beds — rather than as a field-scale soil amendment.
For the volume and consistency a full land needs, PCAT BLOCK C Organic Compost is the practical answer. It is standardised, sieved, and field-proven — the ready-made option for farmers who want the soil-building benefits of quality compost without the time and labour of producing it themselves. Many growers do both: a worm bin for seedling mixes and transplant holes, and PCAT BLOCK C for soil-building across the full plot.
Frequently asked questions
What worms should I use in Zimbabwe? Eisenia fetida — red wigglers, red worms, or tiger worms. These are not common garden earthworms; they are surface-feeding worms bred for composting. Source them from local vermiculture suppliers or from other farmers already running bins. Avoid collecting wild earthworms from your garden — they will not survive in a bin.
My bin smells bad. What is wrong? An anaerobic smell (like rotting slurry) usually means too much moisture, too little airflow, or too much protein-rich food (meat, excess manure). Remove the lid, stir the bedding, add dry shredded paper or dry grass to absorb excess moisture, and reduce food inputs for a week.
Can I use poultry manure in the bin? In very small amounts only. Fresh poultry manure is high in ammonia and will kill worms. Aged or composted poultry manure, added at no more than 10% of the total bedding volume, is acceptable. Cattle or goat manure is safer and gentler.
How do I keep flies and ants away? Always bury fresh food under a layer of bedding. A secure lid keeps flies out. For ants, raise the bin on legs standing in containers of water (a moat). Avoid sweet fruit waste in excess during fly season.
Can I scale up to field level? Yes, with purpose-built worm beds. Commercial-scale vermicomposting uses long, shallow windrows — typically 60–90 cm wide and continuously fed. It requires reliable waste streams (market waste, brewery or abattoir by-products) and reliable moisture management. It is a viable enterprise, but is distinct from a homestead bin. For field-scale soil-building, most Zimbabwe smallholders combine worm compost with bulk compost like PCAT BLOCK C.
Does vermicompost work better than regular compost? Differently, not simply better. Hot compost destroys weed seeds and pathogens and produces larger volumes (FAO on-farm composting). Vermicompost is richer in soluble nutrients and biology per kilogram but is produced in smaller quantities. The ideal system uses both: hot compost for field-scale organic matter, vermicompost for seedlings and transplanting.
Do this now
- Find a suitable container — a wooden box or ventilated crate, 30 cm deep.
- Site it in shade — under a tree or on a north-facing verandah, away from direct summer sun.
- Fill with damp bedding — shredded paper, dry grass, or aged manure to 75–85% moisture.
- Source red wigglers (Eisenia fetida) from a local supplier.
- Start feeding lightly — ¼–½ of worm weight in food per week, buried under bedding.
- Check moisture weekly — the wrung-sponge rule every time.
- Harvest castings after three to six months using the migration method.
- Use in seedling mixes and transplant holes — top up with PCAT BLOCK C for field-scale needs.
PCAT BLOCK C Organic Compost — the locally-made, field-proven compost that rebuilds Zimbabwe’s tired, acidic soils. US$20 per 50 L bag.
Related: make hot compost from farm waste · how much compost per crop in Zimbabwe · read your soil before you spend
- Oregon State University Extension — Composting with Worms (EM-9034)
- FAO Soils Bulletin 56 — Soil Management: Compost Production and Use in Tropical and Subtropical Environments
- FAO — How to Make and Use Compost (Climate Change and Food Systems Resilience in Sub-Saharan Africa)
- FAO — On-farm composting methods
- FAO — Zimbabwe country page
Join our free mailing list and we'll send the full 2026/27 calendar plus weekly seasonal tips.